Selasa, 28 Februari 2017

Enemy To Be Shot At

This time we are going to create enemies that can be shot by the Cat Sprite. The enemies shall be moving from left edge of the screen to the right and disappear on the right edge of the screen. If the enemy touch the Ball Sprite then it disappear. For that, we need two new sprites.


Enemy sprite is the one that will be shot at and the Game Manager sprite is responsible to create the Enemy sprite duplicate every 1 second interval.


Script for Game Manager:


Script for Enemy Sprite:


The same functionality can be done in Unity using the following script.

Script for Game Manager:


Script for Enemy Sprite:


Beside the above Unity Script we still need to do the following actions:
  • Create the Game Manager object using the Create Empty menu. 
  • Create the Enemy Prefab that will be connected to the EnemyPrefab variable in the Game Manager script. 
  • Add the Rigidbody 2D component to the Ball Sprite and the Enemy Sprite and set the gravitation parameter with 0 value so that the sprites will not fall down because of gravity. This component is responsible to give the mass (weight) effect to the Ball and Enemy Sprites that is needed for collision detection between those sprites. 
  • Add the Box Collider 2D component to the Ball and Enemy Sprites. This component is responsible to give boundary that will be used for detecting the collision between sprites.    

Below is tutorial video for the above actions.


To be more detailed, below is the comparison between Unity and Scratch of things that are related with the above script.

Repeat Forever (Forever Loop)

In Scratch


In Unity


Random Number

In Scratch


In Unity


Check Collision

In Scratch


In Unity


OnCollisionEnter2D is a function that is executed in Unity if the Sprite touch other sprite. The collision parameter contain the other sprite that is hit by this sprite. In this function we can check the other sprite name to know what kind of sprite is being hit.


Assignment - 1

Create a Unity program in which there is new enemy that appear from the top edge of the screen every 0.5 until 1 seconds, moving down, and disappearing when touching the bottom edge of the screen. If this new enemy touch the Ball Sprite then the enemy also disappear. Below is the video of the working program.


Assignment - 2

Update the program in Assignment-1 so that the Cat Sprite shall disappear if it hits Enemy that is moving down or moving right.

Clue: When we add the Rigidbody 2D and Box Collider 2D components to the Cat Sprite, unwanted things happens. During shooting, there will be collision between Cat Sprite and the Ball Sprite (Bullet) so that the Cat Sprite will be displaced and we do not want that. To solve the problem, when shooting, the initial position of Ball Sprite has to be moved to a position just above the Cat Sprite position so that collision will not occur. To do that, see bellow picture as a clue:


Assignment - 3

Update the program in assignment-2 so that enemy that move to the right can shoot a bullet. This enemy bullet will be moving down and it is shot every 1 until 2 seconds. If the enemy bullet touches the bottom of the screen it disappears. If the Cat Sprite touches this enemy bullet, the Cat Sprite shall also disappear.


Musuh Untuk Ditembak

Kali ini kita akan membuat musuh yang dapat ditembak oleh Sprite Kucing. Musuh tersebut bergerak dari tepi layar sebelah kiri ke arah kanan dan menghilang di tepi layar sebelah kanan. Jika musuh terkena Sprite Bola maka musuh menghilang.  Untuk itu kita akan membuat dua sprite baru.


Sprite Enemy yaitu Musuh yang akan di tembak dan Sprite Game Manager yang bertugas untuk membuat duplikat dari Sprite Enemy setiap interval waktu 1 detik.

Script untuk Game Manager:


Script untuk Sprite Enemy:


Hal yang sama seperti di atas dapat dilakukan di Unity dengan script sebagai berikut.

Script Untuk Game Manager:


Script untuk Sprite Enemy:


Selain script Unity di atas kita juga harus melakukan hal-hal berikut di Unity.

  • Membuat Game Manager dengan menggunakan menu Create Empty. 
  • Membuat Prefab Enemy yang akan dihubungkan dengan variabel Enemy Prefab di script Game Manager.
  • Menambahkan komponen Rigidbody 2D pada Sprite Bola dan Sprite Enemy dan mengisi parameter gravitasi dengan angka 0 sehingga Sprite tidak jatuh kebawah ditarik oleh gravitasi.  Komponen ini berfungsi untuk memberi efek masa (berat) pada Sprite Enemy dan Sprite Bola yang dperlukan untuk mendeteksi tabrakan antara keduanya.
  • Menambahkan komponen Box Collider 2D pada Sprite Bola dan Sprite Enemy. Komponen ini berfungsi untuk memberikan batas (boundary) Sprite yang digunakan untuk mendeteksi tabrakan.   

Berikut adalah video berisi tutorial untuk melakukan hal-hal yang disebutkan diatas.


Untuk lebih lengkapnya, berikut adalah perbandingan antara Unity dan Scratch untuk hal yang berhubungan dengan script di atas.

Ulangi Terus Menerus (Forever Loop)

Pada Scratch


Pada Unity


Angka Random

Pada Scratch


Pada Unity


Cek Tabrakan

Pada Scratch


Pada Unity


OnCollisionEnter2D adalah fungsi yang dikerjakan oleh Unity jika Sprite menabrak sesuatu. Parameter collision adalah parameter yang berisi Sprite lain yang ditabrak. Dalam fungsi ini kita dapat mengecek nama sprite untuk mengetahui Sprite mana yang ditabrak.

Tugas - 1

Buatlah program Unity dimana ada musuh baru yang muncul dari tepi atas layar setiap 0.5 sampai 1.5, bergerak kebawah, dan akhirnya hilang setelah menyentuh tepi bawah layar.  Jika musuh baru ini terkenal Sprite Bola maka musuh hilang. Berikut adalah video hasil program yang sudah jadi. 


Tugas - 2

Perbaharui program pada tugas-1 sehingga Sprite Kucing hilang jika menabrak musuh yang bergerak ke bawah ataupun musuh yang bergerak ke kanan.

Petunjuk: Saat kita menambahkan komponen Rigidbody 2D dan Box Collider 2D kepada Sprite Kucing hal yang tidak diinginkan terjadi. Saat menembak akan terjadi tabrakan antara Sprite Kucing dan Sprite Bola (Bullet) sehingga posisi Sprite Kucing akan bergeser secara tidak diinginkan. Untuk mengatasi masalah tersebut, saat menembak, posisi awal Sprite Bola harus digeser ke posisi tepat di atas Sprite Kucing sehingga tabrakan tidak terjadi. Untuk melakukan hal itu, lihat petunjuk gambar berikut.


Tugas - 3

Perbaharui program pada tugas-2 sehingga musuh yang bergerak ke kanan dapat menembakkan peluru. Peluru musuh tersebut bergerak ke bawah dan ditembakkan setiap antara 1 sampai 2 detik. Jika peluru musuh menyentuh tepi bawah layar maka peluru tersebut hilang.  Jika Sprite kucing terkena peluru musuh maka Sprite Kucing harus menghilang.


Minggu, 26 Februari 2017

Shooting With Timer

This article is an extension of the previous article with tittle Shooting.

Below is the script in Scratch for shooting in which the shooting can only be done after waiting 0.5 seconds since the last shooting.


The above script uses a variable called CanShoot. The shooting can only be done if the CanShoot variable has the value 1. After the shooting is done, the CanShoot variable is immediately set with value 0 so that shooting can not be done anymore. The shooting can only be done again after the CanShoot variable is set to value 1 after waiting for 0.5 seconds since the last shooting.

Note that in the above script we use broadcast StartCoroutine command to call the WaitForCanShoot block. This is done so that the program for moving the Cat Sprite to the left and right can be executed together with the program for waiting the shooting for 0.5 seconds. In this way, the Cat Sprite can still move while the sprite is waiting for 0.5 for the next shooting.

The same thing can be done in Unity with the following Cat Sprite.


Below is the detailed comparison between script in Scratch and in Unity.

Creating Variable

In Scratch:


In Unity:


It means create a variable called CanShoot with Integer type. Integer is whole numbers like -3,-2,-1,0,1,2,3.


Setting Variable Value

In Scratch:


In Unity:


Comparing Variable Value

In Scratch:


In Unity:


Note that in Unity, for comparing we use two symbols of =.

Parallel Process

In Scratch:

In the above script the broadcast StartCoroutine command  does not wait until the WaitForCanShoot block is completed. This way, the next command after the broadcast Coroutine can be immediately executed together with the execution of the WaitForCanShoot block.

In Unity:


Waiting

In Scratch:


In Unity:


In Unity the above wait command can only be done inside a function that is called using the StartCoroutine.


Shooting

This time we are going to create a program that has the following functionalities:
  1. Cat Sprite can move to the left and right when the right and left arrow keys are pressed.
  2. Cat sprite can shoot a bullet which is a Ball sprite by pressing the space button.  
  3. Ball sprite move up starting from the cat sprite position and disappear at the top edge of the screen.  

In Sratch, we need following two Sprites: the Cat Sprite (Sprite1) and the Ball Sprite (Ball).


Script for the Cat Sprite:


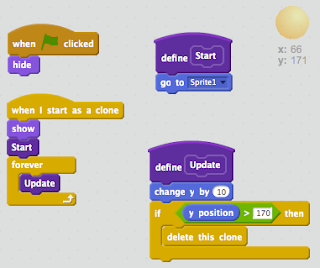
Script for the Ball Sprite:


In Unity, the above functionality will be implemented in two steps.

  • Step 1: Shooting without the ball disappear in certain position. 
  • Step 2: Shooting with the ball disappear in certain position. 

Step 1: Shooting and Ball doesn't Disappear


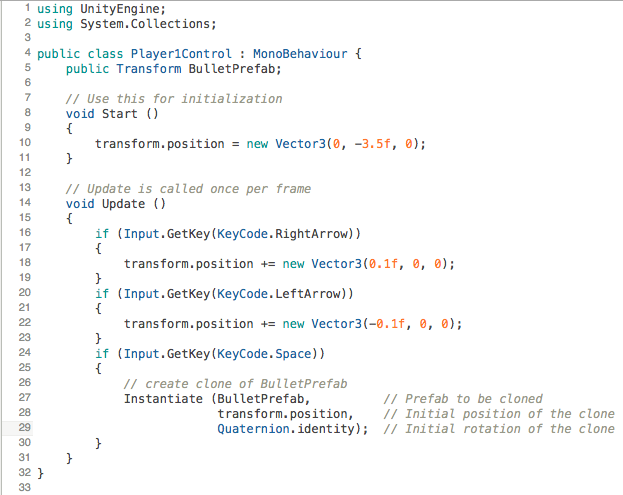
Script for the Cat Sprite:


Script for the Ball Sprite:


To be more detailed, below is the comparison between script in Scratch and in Unity for things that are related with the above script.

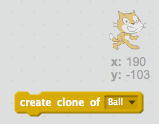
Create Sprite Clone

In Scratch:


In the above script the create clone block is used for creating the clone of the Ball Sprite. When the Ball sprite duplicate is just created we set its position to the Cat Sprite position. This way, the Ball Sprite will move starting from the Cat Sprite position.


In Unity:

Before creating the clone of Ball Sprite, we shall first create a variable with type Transform like the following:


The BulletPrefab variable above shall later be connected with the prefab of Ball Sprite. Prefab is a Sprite that has been put into the asset so that its duplicate can be created.

Below video is a tutorial on how to create a prefab from the Ball Sprite and connect it with the BulletPrefab variable in the Cat Sprite script.


Next, for creating the duplicate of the Ball Sprite prefab, we use the following Instantiate command.


There are three parameters for the Instantiate command:
  • Parameter 1 is the prefab that will be cloned and then shown on the screen. This parameter is filled in with the BulletPrefab that is connected with the Ball Sprite. This way, the Ball Sprite will be cloned and shown on the screen. 
  • Parameter 2 is the position where the prefab will be shown. This parameter is filled in with the position of the Cat Sprite which is the transform.position.  
  • Parameter 3 is the initial rotation of the prefab. This parameter is filled in with Quaternion.identity which means no rotation (0 rotation).  

Step 2: Shooting and Ball Disappear

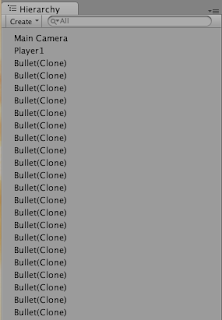
In Step 1, after shooting the ball never disappear. This way the number of balls in the game keep increasing and at the end the game will get slow. Bellow is what will appear when the number of Bullet Clone keep increasing.


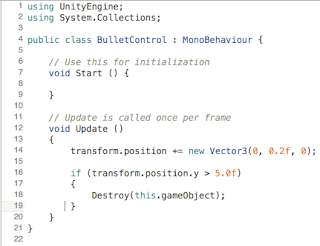
We see above that after shooting the Bullet Clone which is the duplicate of Ball Sprite is never deleted. To delete it we can just update the Ball Sprite script to the following script.


In the above script, if the Y position of the Ball Sprite is more than 5.0 (top of the screen) then we tell computer to delete (Destroy) the Ball Sprite.

Bellow is a more detailed comparison between the script in Scratch and in Unity related to the above script.

Is Position Y > Certain Value ?

In Scratch:


In Unity:


Delete this Sprite Duplicate (Clone)

In Scratch:


In Unity: